How to permanently delete printer list on my Win Vista
Asked By
Misha Bell 140 points N/APosted on - 07/16/2011
Dear Experts,
We are using an HP machine running on a Windows Vista operating system back in the office. And, I have a total of seven printers that I have access to print. The four of those are of not much use to me and is a little bit far from my location so I deleted it and retained the three. But, to my surprise, the next day, after restarting my computer, I noticed that the seven printers are still in my PC.
How do I permanently delete the four other printers? It which makes my list of printers crowded, so I hope someone can help me with the best solution.
How to permanently delete printer list on my Win Vista
Dear Misha Bell,
Here is the permanent solution for your issue. You just want to do simple steps:
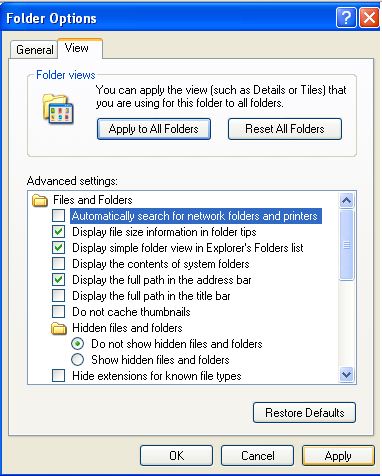
Open your ‘control panel’ and then open ‘printers and faxes’ icon.
Select ‘Tools’ in menu and select ‘Folder Options’.
After opening ‘Tools’, press ‘View’ Tab and uncheck “Automatically search for network folders and printers” and press ‘Apply’ then press ‘OK’.
Now restart your system. Hope your issue will be resolved after this. Remember, before doing this steps, delete all four printer first which you did not want to see in your attached printer list.
How to permanently delete printer list on my Win Vista
Regardless of what version of Microsoft Windows you are using, here’s how to properly remove printers on your computer. First, you need to remove or uninstall the printer software you installed for the printer to remove the driver from your computer. Download the free version of Revo Uninstaller and install it. Once installed, start Revo Uninstaller then select your printer software among the applications and click “Uninstall”.
Follow the normal uninstall process. When you are prompted to restart the computer, click to restart later. When uninstall is complete, click “Scan” to scan your computer for any leftover files and delete everything it finds. This removes everything the program created on your computer. When it is finished, close Revo Uninstaller then restart the computer. After booting, click “Start” then “Control Panel”.
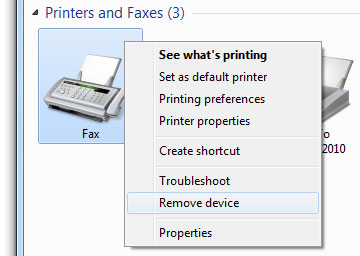
On the next screen, set “View by” located on the upper right corner of the screen to “Small icons” to view all settings. Click “Devices and Printers” then on the next screen under “Printers and Faxes” section, see if the printer you removed still appears. If the printer is still there, right-click the printer and select “Remove device”.
Remove printer
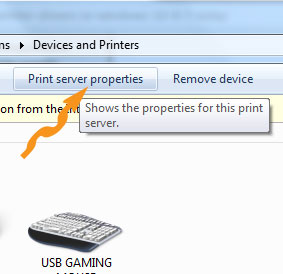
After this, click on any printing device to display the additional menus and click “Print server properties”.
Click Print server properties
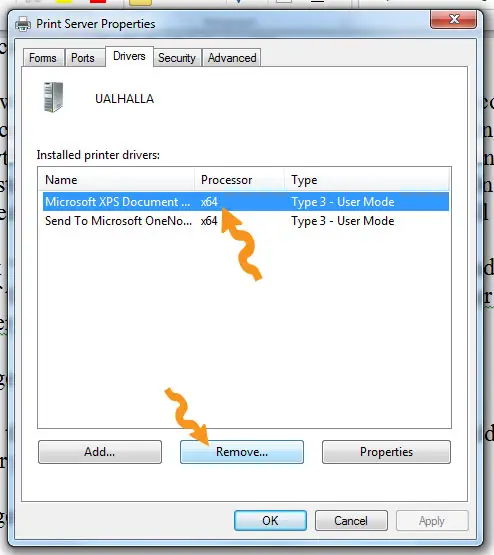
In “Print Server Properties” window, go to “Drivers” tab and select the printer you want to remove. Click “Remove”.
Remove printer driver
Click “OK” all throughout then restart the computer.
Choosing the right Linux virtual private server (VPS) is a critical decision that can greatly impact your online projects, whether you’re running a website, hosting applications, or setting up a development environment. With various...
Have you ever wished you could access your important documents anytime, anywhere? With cloud document storage, that wish becomes a reality. In today’s fast-paced world, secure and accessible document management is more essential than...
Are you worried about data you lost during some operation on your Windows 11? Don’t worry; we are here to guide you on how to recover the lost data from your Windows device in...
The finest laptops are powerful enough to do your daily tasks, comfortable enough to use all day, and power-efficient enough to ensure you don't run out of battery power unexpectedly. Of course, all these...
Before getting into knowing the facts, let’s have a brief about the Dark Web. The dark web is the data of the World Wide Web that is accessible only through special software, combinations, or...
While looking for a chemical-free way to clear and purify both durable and low grounds in your home, a steam cleaner is an excellent solution. With a spurt of superheated steam, this cleaning equipment...
Internet monitoring software keeps a log of all internet activities. You can install this type of software on your computer remotely or by the administrator. An operating console controls this software. This type of...
A Hard Disk Drive is usually partitioned into various smaller drives for optimization. A partition manager helps make this process easier and more efficient. Here, let’s discuss the top 10 best partition manager software.
1....
Music production is the initial stage of any song. Music production can be done either in studios or at home using an online music production software. Here, let’s discuss the top 10 best online...


