CD-ROM receiving power but does not work.

Asked By 0 points N/A Posted on -
qa-featured

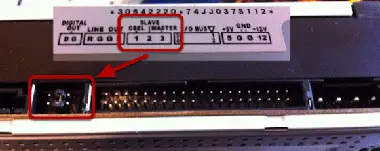
I connect the CD –rom with power cable also with the data cable. But
it don’t show in my pc. What can I do?

SHARE
Best Answer by Garry Bross
Best Answer
Best Answer
Answered By 20 points N/A #97862

CD-ROM receiving power but does not work.

qa-featured


There is no exact solution for this because this can be happened by much reason now I tell most of them. I try to help you as most I can by telling all I know. Your CD drive may be damaged or dead or your connection may be lose so ensure that the connection is tightly bonded. On the other hand mostly caused problem is driver problem so if you think that the problem is caused by the driver that go to this site : https://www.computerhope.com/issues/ch000227.htm . Problem can also be caused by viruses so use anti-virus and clean all the virus from your computer. You can also take solution from this site: https://www.computerhope.com/issues/ch000031.htm .

Answered By 15 points N/A #97864

CD-ROM receiving power but does not work.

qa-featured

Hi,


Try using a different, known to work, data cable as well as power cable, perhaps it is not really getting any power. If you can get the optical drive tray to come out by pressing its eject button, then it should be getting power. Check the BIOS and see if your optical drive has not been disabled. If it is enabled, then it is your operating system that's at fault. Check the Device Manager if the optical drive has not been disabled there. If it is not, try running this application from Microsoft to try and fix non-detection of optical drive (Microsoft Fix It):


https://support.microsoft.com/en-us/help/2970908/how-to-use-microsoft-easy-fix-solutions


Thank you. Hope it helps.


Clair june

Answered By 590495 points N/A #300820

CD-ROM receiving power but does not work.

qa-featured

If that’s the only thing you did, your optical drive will not appear on your computer. The drive has to be detected first in the BIOS just like when installing a normal hard drive. Before connecting the power cable and ribbon cable to the optical drive, make sure the CPU is turned off. Once the cables are connected, set the correct jumper setting for the drive.

Optical drive jumper setting

There are three settings when configuring a drive: master, slave, and cable select. When set to “Master,” it forces the device or drive to become “Drive 0” which allows you to boot from the drive just like a regular system drive. This is required when booting the computer from the optical drive when installing Microsoft Windows.

When set to “Slave,” it forces the device or drive to become “Drive 1” which basically doesn’t allow booting from the drive. When set to “Cable Select,” it assigns the role of the drive based on its location on the data cable or ribbon cable. If the drive is connected to the end of the ribbon cable, it will be assigned a status of “Master” (Drive 0).

If the drive is connected in the middle of the cable, it will be assigned a status of “Slave” (Drive 1). Normally, there is a fourth pin called “Park” which is used as a place to store the jumper. Once the optical drive is set with the correct jumper setting, start your CPU and go to the BIOS. Go to the hard drive section and detect your drives.

Optical drive

When your optical drive appears together with your hard drive, save the settings and restart the computer. You are now ready to use your optical drive. Note: if you don’t detect your drive in the BIOS, it will not appear in Microsoft Windows. For the correct jumper settings, see the bottom or top of the optical drive.

Related Questions