Asked By
Ruth A Auten 0 points N/APosted on - 03/05/2013
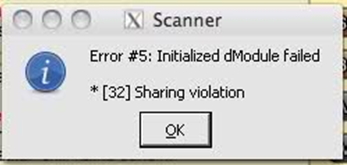
I am trying to share my scanner to my other computer. But when I give command to take some scanned images. It shows me this error which you can see in the below attached image. I need your help. Thanks
I have read the question of yours identified the problem causes because of the communication error between the PC and the scanner in order to avoid this u need to try several methods
1st Check the cable whether it has been plugged properly both side (scanner & PC)
2nd Check the Power is coming to the scanner properly
3rd make sure you have no issues with electricity, because if the exact power scanner need is not available the printer will give this error
4th Make sure the scanner software are properly installed and configured
5th Make sure the software version is compatible with your OS version
That’s a sharing error which can happen if the device you want to use over the network is not shared properly with other computers. Before you can use a device like a printer or scanner across a network, the device must be shared properly.
To share your scanner or printer properly across the network, on the computer where the printer or scanner is directly connected, click “Start”, “Control Panel”, “Printers and Other Hardware” then “Printers and Faxes”.
Here, right-click your printer or scanner and select “Sharing”. In the printer or scanner’s “Properties” window, in “Sharing” tab, make sure “Share this printer” is selected then enter your device’s shared name in the “Share name” text field. For example, without quotes “Scanner network” then click “OK”.
Sharing a scanner/printer across the network
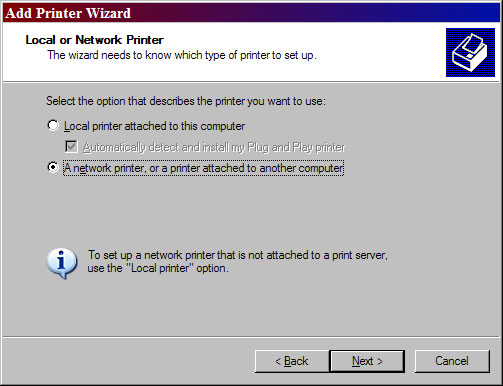
After this, you need to add the shared printer or scanner to the rest of the computers on the network. To do this, on every computer, click “Start”, “Control Panel”, “Printers and Other Hardware” then “Printers and Faxes”. Next, click “Add a printer” then click “Next”. In “Add Printer Wizard” dialog, select “A network printer, or a printer attached to another computer” then click “Next”.
Add the shared printer/scanner to the rest of the computers
Windows will then search the network for possible shared devices and display the results on the screen. Select the shared device you created earlier called “Scanner network” then click “Next”. And that’s it. The shared printer or scanner should now appear on the computer.
I’m not a tech geek. I don’t keep up with every new gadget launch. I fly a few times a year, watch many movies on my phone, and live in a small apartment where...
With 2025 just around the corner, it is time to start thinking about what tech trends will be coming our way. Tech moves at a rapid pace. Some things may pop up next year...
Choosing the right Linux virtual private server (VPS) is a critical decision that can greatly impact your online projects, whether you’re running a website, hosting applications, or setting up a development environment. With various...
The finest laptops are powerful enough to do your daily tasks, comfortable enough to use all day, and power-efficient enough to ensure you don't run out of battery power unexpectedly. Of course, all these...
Before getting into knowing the facts, let’s have a brief about the Dark Web. The dark web is the data of the World Wide Web that is accessible only through special software, combinations, or...
While looking for a chemical-free way to clear and purify both durable and low grounds in your home, a steam cleaner is an excellent solution. With a spurt of superheated steam, this cleaning equipment...
Internet monitoring software keeps a log of all internet activities. You can install this type of software on your computer remotely or by the administrator. An operating console controls this software. This type of...
A Hard Disk Drive is usually partitioned into various smaller drives for optimization. A partition manager helps make this process easier and more efficient. Here, let’s discuss the top 10 best partition manager software.
1....
Music production is the initial stage of any song. Music production can be done either in studios or at home using an online music production software. Here, let’s discuss the top 10 best online...


