While Downloading Xbox Update, The Computer Gives 0x80244018 Error

Asked By 0 points N/A Posted on -
qa-featured

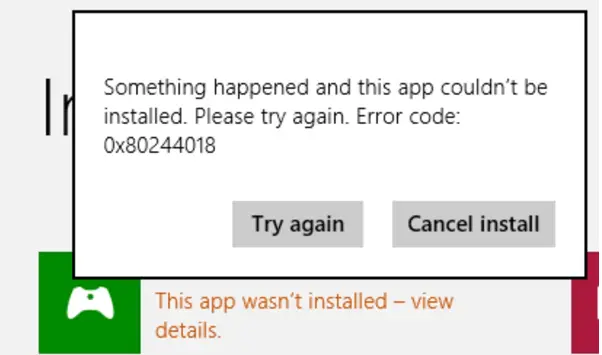
What is the 0x80244018 error? Why the system can’t update the services and throws this error message? Describe the step to resolve this error code.

SHARE
Answered By 0 points N/A #344529

While Downloading Xbox Update, The Computer Gives 0x80244018 Error

qa-featured

0x80244018 error is a Windows store error, and it is one of the bugs that rolled out with the regular Windows Update KB4038788 (OS Build 15063.608). The error occurs on Windows Store and, although it does not prevent the Store from running, it doesn’t allow downloading and installing any apps. Some methods to fix the 0x80244018 error code are as follows:

Method 1:

Recreate the AppReadliness folder.

Step 1: Open This PC and click on the View tab at the top of the Window.
Step 2: Select the Hidden items option to show hidden files, folders, and drives.
Step 3: Click Options and select Change folder and change options.
Step 4: Open the View tab and unmark Hide protected operating system files (Recommended) option.
Step 5: Click on OK to save changes.
Step 6: Go to C:\\Windows and create a new folder, then name it AUInstallAgent.
Step 7: Reboot the system and check for the error is resolved or not.
Step 8: If the problem continues, go to C:\\Windows directory and create a folder named AppReadliness.
Step 9: Restart the system and check for the occurrence of the error.

Method 2:

Check the System for Malware.
Start the system and perform a full utility scan to check for the malware.

Method 3:

Remove the update that caused the 0x80244018 Error.

Step 1: Right-click on the Windows key and select Settings.
Step 2: Select Update & Security and open Advanced Options.
Step 3: Select Update history and click Uninstall Updates.
Step 4: Select the update that triggered Windows Store bug and click Uninstall.
Step 5: Restart the system.

Method 4:

Deactivate the proxy server.

Step 1: Open the web browser and locate the three dots on the upper right.
Step 2: Launch the menu and continue the Settings.
Step 3: Opt for the Advanced section.
Step 4: Continue with the Open proxy settings section. Now you will be provided with the Internet Properties window.
Step 5: Select the LAN settings buttons.
Step 6: Deselect the Automatically detect settings option that is placed under the Automatic configuration section.
Step 7: Ensure that Use a proxy server for your LAN is not selected also.
Step 8: Click on the OK button to save changes.
Step 9: Click on OK again.

Related Questions