Remove Red Eye from a Photo using Corel Photo Paint Program

Asked By 20 points N/A Posted on -
qa-featured

Hello guys! 

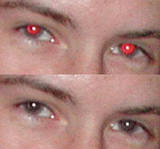
I am just new to Corel Photo Paint Program and I usually use it to paint something. It is my first time to edit a photo using this software. You see, I have a photo but the Red eye really distracts me that much. How do I remove it anyway? Can you reply back with a step-by-step process for newbies? 

Thanks!

SHARE
Best Answer by Brown Talks
Answered By 0 points N/A #165739

Remove Red Eye from a Photo using Corel Photo Paint Program

qa-featured

Photo editing software such as Photoshop and Corel allows you to enhance image quality and that includes fixing red eye with red eye removal tool. Click on Tool Palette icon with red eye and drag your mouse over the image red eyes and notice it will change in natural color. 

Here's another way, 

Select the image from your system that you want to correct.

Click the Effects Brush icon from the Brush Tools. Next, on the Property bar (drop down menu) on the left Select, Hue (icon) from the drop down on the Property Bar and then choose the Red Eye brush. Enlarge in on the red eyed image, and if needed, adjust the Nib size of the brush to fit the eye on the image. Gently stroke circle around the eye to remove the reds until it is completely gone or until the desired color of the eye is achieved.

Photo editing software such as Photoshop Click the Effects Brush icon from the Brush Tools Property Bar and then choose the Red Eye brush
Best Answer
Best Answer
Answered By 0 points N/A #165740

Remove Red Eye from a Photo using Corel Photo Paint Program

qa-featured

Hi,

Corel Photo Paint 10 can be used for removing red-eye. Go to File, select Open, and open your desired image, by double clicking the file. To find red color, zoom on your eye, using the zoom tool. Then, mask the area in order to select eye pupil that needs to be painted.

You can do this by clicking on: select Mask tools .Next, select the normal button, find circle from the mask tools. Cover with this circle your pupil by dragging it over desired pupil. Next, click the feather button on the property bar, and set to 5 pixel size. 

Also, you can try different pixel size, see which is most suitable. Now, what you need is to add a color and remove your mask. To add a color, go to Effects, go to red eye removal, open replace color and select black color, and click OK.

Next, remove the mask by clicking on your mask, and select remove mask. You will need to repeat the same procedure for the second eye. When finished, zoom into your image using navigation button in the bottom down corner of your image. Save your new image by using a different name. See that your red eye was removed.

Hope this
Answers your question!

Related Questions