Installation of PhysX error code

Asked By 0 points N/A Posted on -
qa-featured

Hi everyone,

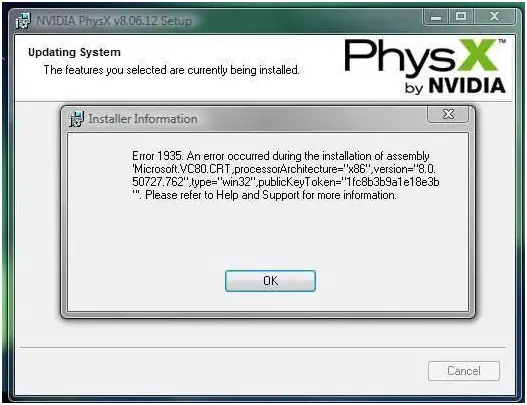
After a few tries to install Ageia drivers I gave up and decided to ask for help online. Here’s the thing, when I’m almost finished with the installation of PhysX an error code comes up:  “Installer Information

Error 1935. An error occurred during the installation of assembly “Microsoft.VC80.CRT processorArchitecture=“x86” version=”8.0.50727 type=win32 publicKeyTken=“1fc8b9a1e18e3b”.

Please refer to help and support for more information.

Ok

If someone can help from a similar experience please contact me.

Thank you in advance.

SHARE
Best Answer by Sharath Reddy
Best Answer
Best Answer
Answered By 590495 points N/A #91902

Installation of PhysX error code

qa-featured

You are using the older version. Download the latest version of NVIDIA PhysX. The latest version is 9.10.0513.

Save it in a different folder. After downloading NVIDIA PhysX create a shortcut in your desktop for the installer.

  1. Right click anywhere in your desktop then select New > Shortcut.
  2. Click Browse.
  3. Locate the NVIDIA PhysX installer and then select OK.
  4. Add /quiet at the end of the command line and then click Next. For example, d:folderPhysX_9.10.0513_SystemSoftware.exe /quiet.
  5. Type any name for the installer then hit Finish.

Double click the installer’s shortcut and wait for it to finish. Here are the system requirements for NVIDIA PhysX and other information:

  • Windows XP 32-bit and 64-bit, Windows Vista 32-bit and 64-bit, Windows 7 32-bit and 64-bit

    • Version 9.10.0513
    • Released on August 11, 2010
Answered By 0 points N/A #91904

Installation of PhysX error code

qa-featured

Step 1: To correct this install error, you need to clear the log.

a. Open an Administrator command prompt: Right-click Start > All Programs > Accessories > Command Prompt and select "Run as Administrator" and click "Allow" for the elevation prompt

b. In the command prompt, type the command below:

fsutil resource setautoreset true C:

c. This assumes that C: is the drive in which Vista is installed. If it is installed on another drive like D:, please change the drive letter appropriately.

d. Reboot the system.

e. Install the software and check.

Step 2: Check if you are able to install in clean boot.

How to perform Clean Boot


Note: Please ensure that the computer is set to start as usual by following the step 7 from the article.

Step 3: Repair .net framework and check.

Repair the Microsoft .NET Framework installation

To do this, follow these steps:

a.    Click Start, click Control Panel, and then click Add or Remove Programs.

b.    In the Currently installed programs list, click Microsoft .NET Framework, and then click Change/Remove.

c.    Click Repair, and then click Next.


Regards: saifiit

Related Questions