How to transfer Microsoft Access tables to Visual Basic

The first thing you need to do to show a table from an MS Access database to Visual Basic is to use ADO and a Data control. Most of the time when I am only showing a single table from MS Access to my interface, I preferably use the MS ADO Data Control 6.0 and MS Data Grid Control 6.0.
The ADO Data Control will enable you to create a connection between a database and your interface in Visual Basic, while the DataGrid control will look like as a table having all the data and columns from the table in your database.
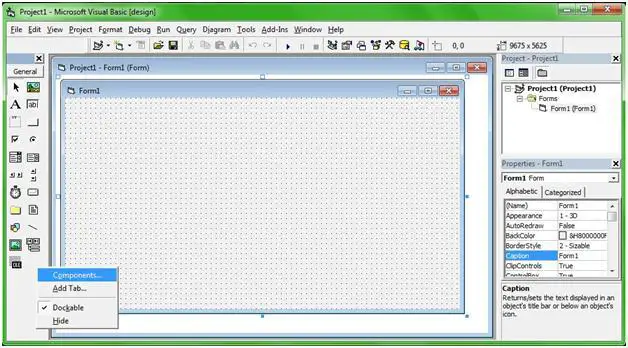
To start with, first you want to add the ADO control and DataGrid control in the toolbox of the VB window.
To do this right-click on the empty space in the toolbox, and click Components on the Popup menu.
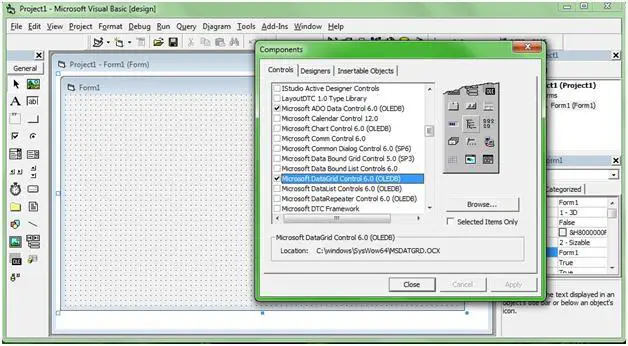
Then a new window will appear. In this window find and check on the check box that reads, Microsoft ADO Data Control 6.0 (OLEDB) and Microsoft DataGrid Control 6.0 (OLEDB).
Then click Apply, noticed that when you do this two new controls will appear at the toolbox.
Click Close and we are ready to add this two objects in the Form.
Second we should add the ADO Control in the Form and create a connection.
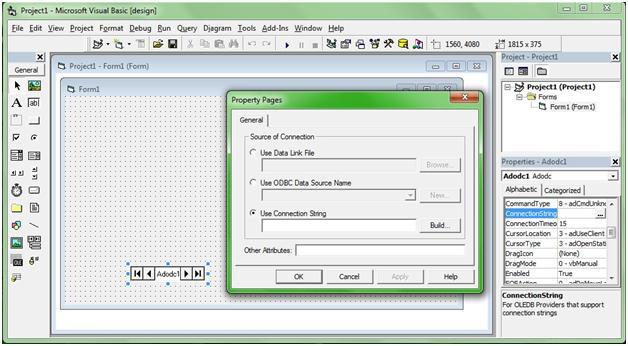
Next to create a connection, click on the property of the ADO named, ConnectionString (Make sure the control is selected by clicking it. Scroll down the property page if you can’t see the property).
When you double click on the property name or click on the browse icon (a square box with, ‘…’ inside) next to the property name a new window will appear.
Then on the new window that will appear, click on Build.

After clicking on Build another window will appear, this is where we select the connection provider and browse the MS Access file.
To do these, select the provider under the name, Microsoft Jet 4.0 OLE DB Provider.
Then click Next to proceed to the next window.

Then on the next window enter the directory of the database file in textbox under ‘Select or enter a database name:’ or simply find the file by clicking the browse icon next to the textbox.
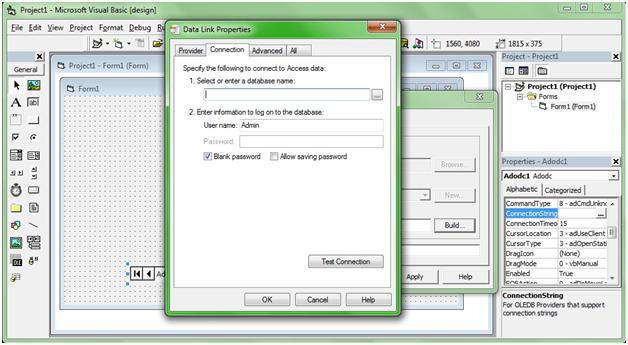
Browse for the file and click open in the windows explorer.
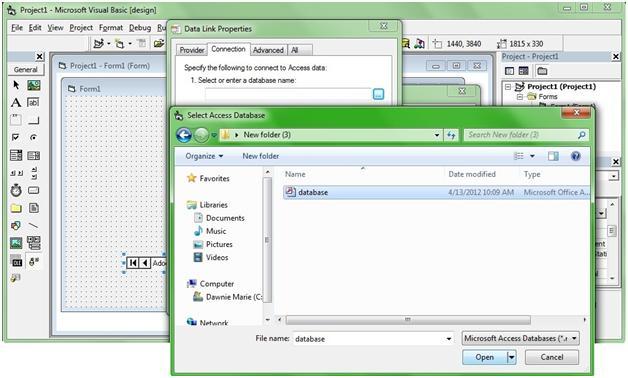
You could neglect the next textboxes in this window. After putting the file, you can text the connection by clicking the button, Test Connection.
If a message box appears confirming if the connection succeeded,close the message box and click Ok in the Data Link Properties window, if not check the directory of the database, or clear the textbox and browse for it again.
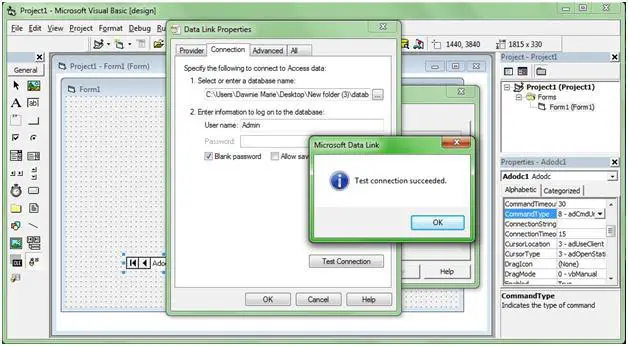
Note: When connecting an MS Access database on VB it is also important to save the database as an MS Access Database (2002 – 2003 format) to have a file extension of .mdb. If you have a database saved as 2007 or 2010 format, just convert it to If you have a database saved as 2007 or 2010 format, just convert it to 2002-2003 format by opening it and saving it as 2002-2003 (Click File, then Save As).
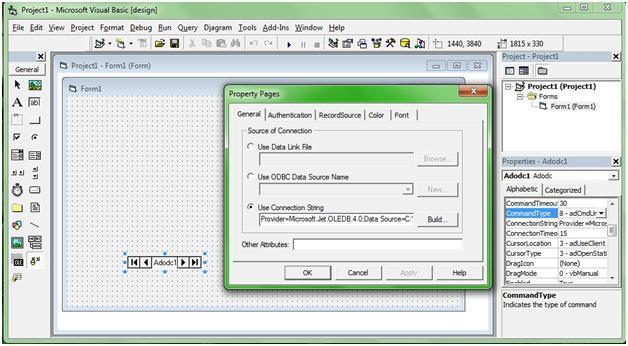
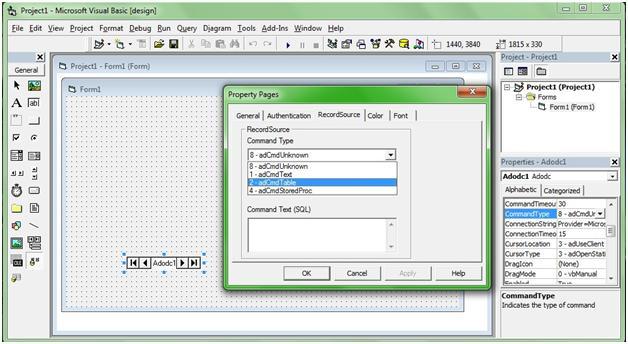
When you click the Ok button, notice that we will go back at the Property Pages window. Click Apply and notice that four new tabs will appear in this window. Click on theRecordSource tab in this window. This is where we choose which table are we going to show or use in VB.
In the RecordSource tab click on the dropdown button of the Command Type combo box and select ‘2-adCmdTable’.
This selection will tell the program that you are going to choose or show a table and will include a list of tables in the next textbox, from the database that you had chosen lately.
Next, choose from the combo box which table (if you have multiple table) from the database, are you going to use or show.
Finally, click the Apply button.

The next thing we should do is add a DataGrid control in the form and use the connection in the ADO we have created lately.
Add a DataGrid control in the form from the toolbox we have added in there lately.
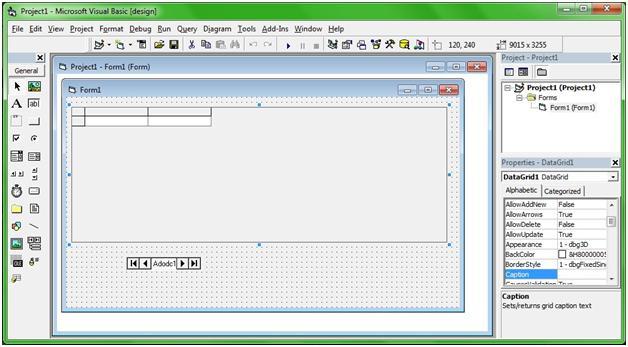
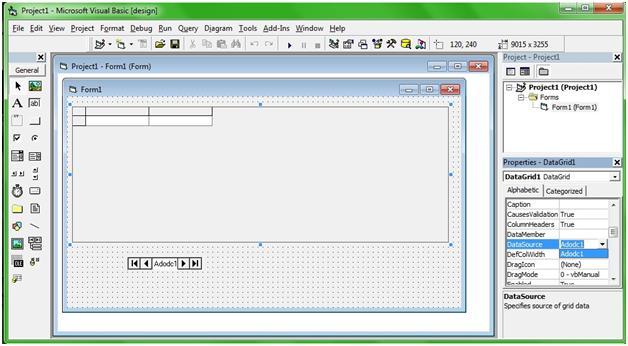
In the property page of the DataGrid control, find the property named DataSource (scroll down the property page if you can’t see the property).
Click the dropdown button and select the name of the ADO (Adodc1) we have added lately and run the program to see what will happen.
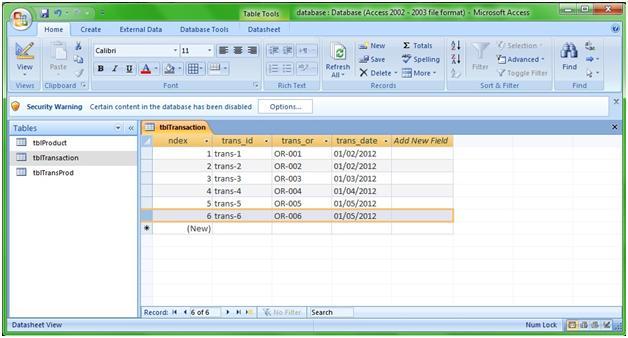
Notice this table below.
I followed the steps above, created a connection in VB and added a DataGrid control.
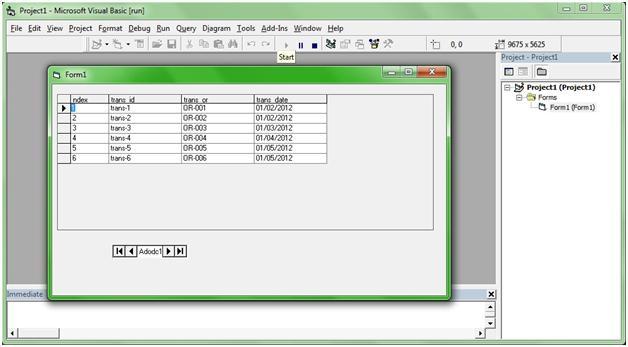
During runtime, this is what it will look like:
To show a table in VB you should:
1. Add a DataGrid and an ADO control in the toolbox.
2. Add an ADO control in the form.
3. Create a connection.
4. Add a DataGrid control in the form.
5. Set the property DataSource, of the DataGrid in the corresponding ADO.
6. Run and debug.
Sometimes if you don’t want to show the ADO during runtime, set its property Visible into false. When you want to show multiple tables, add multiple ADO’s for each different table. You could also use TextBoxes instead of a DataGrid if you are showing a single field and data in VB from a database.
The steps are the same except that you should set the property of the textbox (or other control), DataField, into a corresponding field or column in the database.


