Learn v2v Migration in VMware.
Asked By
0 points
N/A
Posted on - 06/03/2020

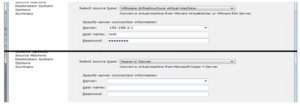
I’m facing many difficulties in v2v Migration in VMware. I have gone through many websites, but still, I’m not able to find the process for the v2v Migration in VMware. I’m Posting here my problem, hoping for the solution ASAP?


