Bootable USB drive to mount GUI for Linux

Hi there,
I am using a USB drive which is used only for booting in Linux operating system. I use Linux mint 9 Isadora. The whole work is nearly easy and you can install it like we install windows. Just insert the disk into the disk driver and follow the instructions given the appearing box.
After finishing the installation process you can easily boot from that USB driver. Just during the installation processes select the USB driver as installation drive.
Now just reset the GRUB and install ms-sys. Then you can boot from Linux whenever you want.
Best regards,
Riley Weaver.
Bootable USB drive to mount GUI for Linux
Make sure your USB stick is formatted as FAT16. It should be FAT16 not FAT32 or NTFS. FAT16 is nearly always abbreviated to merely FAT in most Windows operations.
Please note: the maximum size of the USB stick that you can use as a bootable stick is up to 4GB. Unfortunately larger devices can't be formatted as FAT16.
Open ‘My Computer’, right click on your USB drive and choose properties:
If the ‘File system’ isn’t FAT then you’ll need to format the USB stick as FAT16 (FAT). Right click on the drive and choose ‘Format’.
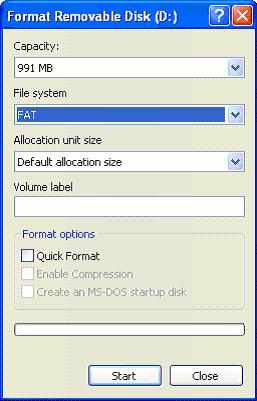
Make sure that FAT is selected because the classification system. It’s best to depart the ‘Quick Format’ option un-checked.
Note: If you receive a message stating ‘Windows was unable to complete the format’ then in some cases the format has actually finished and this message can safely be ignored.
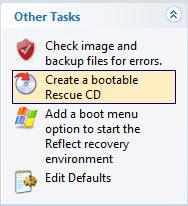
We need to form an image of the bootable CD therefore we can transfer the contents to the USB stick.
Start replicates, click the ‘Other Tasks’ panel, so click the ‘Create a boot-able Rescue CD’ option.
The Rescue CD wizard can open.
Ensure that the Linux option is chosen and click on 'Next'.
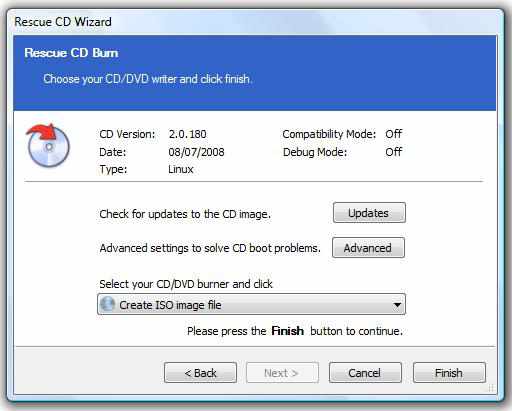
The next Wizard page is that the burn page.
Click the CD/DVD burner drop-down list and choose ‘Create ISO image file’.
Click ‘Finish’ and select a location for your image file. For this example we’ll select c:rescue.iso’ as the destination.
Make a copy of the ISO Image and save it on your USB Stick.
To make your USB stick bootable with the contents of your Linux boot image we want to transfer a free utility referred to as ‘UNetbootin’ from here: http://unetbootin.github.io. Select the ‘download for Windows’ option and save the file to your desktop or anyplace you'll be able to simply access it.
Double click ‘unetbootin-windows-282.exe’.
The dialog listed below will appear:
Select the Diskimage option and choose the trail to your image file created previously.
Select ‘USB Drive’ as your target disk sort and select your USB stick drive letter within the drop down list.
Click ‘OK’ make a copy the image files and create the USB stick bootable.
That’s it! You’ve created a bootable USB stick. Once you restart you must see the Linux rescue setting loaded from the stick.


