Asked By
mr samuel
0 points
N/A
Posted on - 06/27/2016

When I installed Microsoft Office Professional Plus 2013, and I got a message that displays 'Error 1920 Windows font cache service failed to start. How can I fix this error?
Windows Font Cache Service Not Starting.
You can fix this error by following these steps:

(i) Press Windows+R
(ii) Type services.msc
(iii) Press Enter.
(iv) Click on Office 64 Source Engine –> Properties
(v) Tick mark Startup Type under General Type
(vi) Select Automatic (vii) Click Start.
(viii) Click Apply–> OK
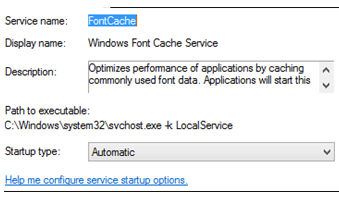
(ix) Now search for Windows Font Cache Service.
(x) Select Automatic.
(xi) Open system 32 folder and find FONTCACHE.DAT and delete it.
(xii) Restart your system.
Windows Font Cache Service Not Starting.
The full error reads:
“Error 1920. Service ‘Windows Font Cache Service’ (FontCache) failed to start. Verify that you have sufficient privileges to start system services.”
I’m not sure if this error still appears today as it was first encountered back in 2012 when a user was installing Microsoft Office Professional Plus 2013 on Windows 8 Pro. There are many suggested workarounds but not all is a perfect solution. Try this one. Press the Windows key + R to bring up the “Run” dialog then type the following and then hit Enter:
services.msc
This will directly open the “Services” window located in “Administrative Tools” in the Control Panel. Scroll to the bottom and locate the service called “Windows Font Cache Service” and double-click it to open the “Properties.” On the next screen, go to “Recovery” tab then change all failure options to “Take No Action.” When you are finished, click “Apply” then “OK.”
After this, try installing Microsoft Office again. If this doesn’t help, here’s another one. Go back and open the “Services” window again and double-click “Windows Font Cache Service” to open the “Properties.” In “General” tab, click “Stop” then “OK.” Next, open Windows Explorer then navigate to the following location:
C:\Windows\ServiceProfiles\LocalService\AppData\Local
These folders are hidden by default. If you can’t see them, in Windows Explorer, click “Tools” then “Folder options.” Go to “View” tab then under “Hidden files and folders” section, select “Show hidden files, folders, and drives” then click “OK” all throughout. Now, delete all FontCache “dat” files. They will be regenerated over time.
When you are finished, double-click the “Windows Font Cache Service” again to open the “Properties” then click “Start” and then “OK.” Another thing, if you have “Tuneup Utilities” installed and running, try to disable it temporarily and then install again.


