Asked By
Carl James
220 points
N/A
Posted on - 05/27/2011

I bought a scanner yesterday and I want to connect with my computer. I thought setting up scanner is the same way of setting up a printer. But apparently i don't know how to set up and connect to the computer.
Can you guys give me some brief instructions so that I can successfully connect to the scanner to my computer? Have something' to do importantly so that's why I'm eager to know the set up. And by the way, is it advisable to connect the scanner using laptop? Would it be working? If that's so, what are the steps to be able to connect to the laptop.
Post your answers and I'll be glad to read your response.
Thanks.
Answered By
wyalung
0 points
N/A
#106623
How to properly connect a scanner to my computer?
Connecting and installing a new scanner on the Laptop is like installing a printer but needs to be careful about some details like if you have already installed some imaging programs. Installing scanner also needs some time for it to be completely successful. Note: Make sure that your computer meets the minimum system requirements of the scanner that you are connecting.
Here are the steps on how you can setup the new scanner on your Laptop.
Check the box contents if all parts of the scanner are complete. You need to setup the newly bought scanner, leave the way it sets up and don’t connect it to the laptop yet.
If possible back up your files. I am advising you to do this just in case you encounter some problems at least you your important files are already saved.
Check the installed programs that are no longer in use and kindly uninstall them. Important: Check also if you have some imaging programs and you need to remove them for not to cause any problems. (Start >> Control Panel >> Add/Remove Programs (for XP) or Programs and Features (Vista/Windows 7)).
You need to close any open programs and we can start now with the installation.
Insert the Scanner Setup CD in the laptop’s CD or DVD Drive.
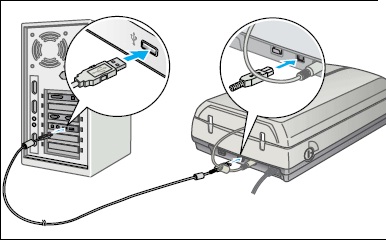
If the installation program prompted you to connect the scanner to the laptop, kindly connect it with a USB cable to your laptop’s USB port.
If the installation program has the option to register it, please register it.
Just follow the steps provided and wait for the installation process to finish.
After the installation, restart the laptop.
Run some test scan to make sure that the process is successful.
If after installation and still the scanner won’t work try these troubleshooting steps:
Try to check all cable internet connections if they are working fine. Check also all USB ports of your laptop if they are all working fine.
Kindly disconnect the Scanner USB cable from the laptop and reconnect it and try to run a scan test.
Turn off the laptop as well as the scanner and wait for 10-20 minutes before turning it on. Disconnect the USB cable of the scanner from the laptop.
Turn on the laptop and the scanner, reconnect them using the USB cable. Try to run a scan test again.
If still the scanner won’t work, uninstall it and redo the process. (Do the same un-installation process: Go to Control Panel and uninstall the Scanning software).
If in case you receive some installation file errors make sure that all programs are closed and then uninstall and reinstall the scanning software.
Note: You must have a plenty of time to sit on this installation process. These instructions will work for most brands of scanners. The best thing is still you need to check and if possible follow your scanner manufacturer’s instructions.
How to properly connect a scanner to my computer?
Hi Carl,
Yes you are right, it’s just like you are installing a printer. But first you must know if your scanner is supported the system requirement of your PC?
You didn’t mention what is the brand and model of your scanner, so I can’t tell if your PC can support the scanner, but you can see all the information about the scanner in the manual. Just take some time to read carefully the manual specially the DOs & DON’Ts of the printer.
But anyway I give you some Idea how to install your scanner to your PC.
First plug the cord of your scanner in to your PC (USB cord) and then boot up your PC.
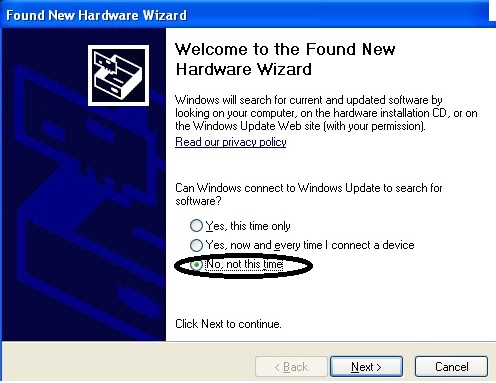
When PC is up, it will automatically detect a new hardware that is the scanner you attach to the computer.
Just cancel the installation wizards that’s popped up, sure enough that it will not detect the scanner, all you have to do is get the installation CD of the scanner and put it into your CD or DVD drive.
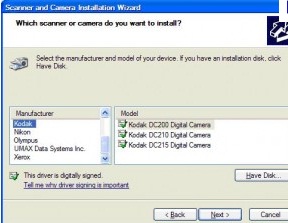
If the installation CD is automatically run then follow the simple installation wizards that pops up, if the CD is not run automatically then you will have to run it manually.
Go to windows explorer and locate your CD/DVD drive and click on the drive and look for the auto run or install.exe and it will run the installation wizards follow the instruction of the wizards and after the installation it will restart your PC.
When the computer is up you can now use your scanner.
Now it’s up to you to test it, and by the way the scanner needs an image viewer and it also in the installation CD of the scanner.
Good luck,
How to properly connect a scanner to my computer?
Installing a scanner on your computer is pretty much the same as with installing a printer. First thing is installing the device’s driver software. The device or the scanner will not work without this software. The driver is usually included in an installation CD in the package when you buy your product.
Nowadays, scanners are built-in to printers but you can still find standalone scanners being sold in the market. Now, to install, get the installation CD for your scanner and insert it on your optical drive and then install the scanner software. If you no longer have the installation CD, you can always download it from the manufacturer’s website.
Try downloading from the following manufacturers if you have them:
Once installed, connect your scanner and start scanning. The driver software allows the computer to properly identify the scanner. To scan documents and other items, you need a scanning software like ABBYY FineReader. Download the latest ABBYY FineReader. The latest version at the moment, ABBYY FineReader 15, supports Windows 7, Windows 8.x, and Windows 10.
It requires 1 GHz or faster x86 or x64 processor with SSE2 support, 1 GB RAM, 1.2 GB free space, 1024 x 768 minimum screen resolution, and internet connection for product activation. If you want to try the program first, you can download the ABBYY FineReader 15 Free Trial. The trial version works for thirty (30) days counting from the date you installed.
The free trial is limited only to process up to 100 pages. Among its features include:
- Edit and organize PDFs
- Compare documents in different formats
- Collaborate on and approve PDFs
- Digitize paper documents and scan with OCR
- Sign and protect PDFs
- Automate conversion and digitization procedures
- Convert and create PDFs
- Work easily with universal PDF tool


