Asked By
abel abel
0 points
N/A
Posted on - 12/16/2012

Hi,
I am using Photoshop CS6 and I’m very new in using this software. Right now, I’m practicing using it as a prerequisite of my job. Now, my boss wanted me to create gold frames for Photoshop. How can I do it? Can you tell me what the basic process for this? What tools do I need to download? Tutorials would be better if you can give me links.
Thanks.
How to create gold frames for photo shop?
Hi Abel,
Well if you have Photoshop then you don’t need any other software to create frames in Photoshop.
In this solution I’ll tell you how to make nice and attractive frames in Photoshop.
-
First of all you have to take a picture which you want to change in frame in Photoshop.
-
Press Ctrl+J on keyboard for the duplicate layer.
-
You need to open a layer window. If it’s not opening then press F7 to open it.
-
Now you have to change the image settings by pressing Ctrl+Alt+C or click on the image canvas size.
-
In that screen put the number of pixels on your own for the picture. I’ll recommend you 40 pixels on both sides.
-
Now you have to activate relative under the pixel check boxes and make sure that color is white.
-
You can see the now little shaded frame now.
-
Hold the Ctrl key and click on your duplicate layer.
-
Now you can see a selection.
-
You have to hold an ALT key and click on one of the corners of the frame where you can make this frame little bit smaller and press Enter.
-
Yours selected area will be smaller now.
-
Now click on the layer window to add a layer mask.
-
You have to make a new layer.
-
Press D and then X to set your foreground colors of the framed picture.
-
From paint bucket tool to fill it with white color.
-
If you see a white picture then everything is going in a good way.
-
Left Click on upper layer hold it move downwards.
-
Your goal is to put between a lower layer and middle layer.
-
When you see a dotted indication, stop moving your layer.
-
Your picture is in the middle now and you can see your picture again.
-
You have to click on the indicated layer mask.
-
There are many majesty filters and you can use many of them and you can also combine them.
-
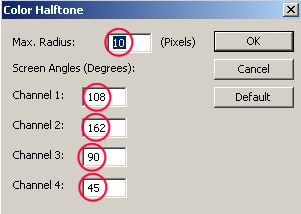
Just select Filter-Pixelate-color-halftone.
-
With these settings.
Now click on middle layer and go to edit file to choose pattern and select indicated pattern.
Your frame is ready and you can try other patterns too.
I’ll surely look different with different patterns. Please do not forget to click on the indicated layer mask if you want to change the pattern scheme.
I hope this manual tutorial will helps you a lot.
Good Luck!
Regards,
Jhonstoon Leen


