
What are the steps by step procedures to follow to change the hard disk on my desktop computer? I am a student in the Second cycle school in one of the West African countries. I have managed to buy a desktop computer to try my hands on lessons taught at school concerning ICT. In recent times I realized my hard disk is not responding quiet well. On enquires I have been advised to change my hard disk. Thank you.
Answered By
de Blair
10 points
N/A
#193993
Desktop Computer Hard Disk replacement by Second Cycle student in West Africa
Hello,
Replacing or adding new hard disk is one of the easy hard ware implementation procedures. But before proceeding, you make sure of certain points:
-
First, back up all important information from the old hard disk; if still possible to do so.
-
If you’re old hard disk was a 3.5 inch drive and new one is a 2.5 drive then make sure your computer case has support for it, or you have an adapter kit.
-
Become assure of having compatible hard drive for your computer. It may be identical to your old one, or may be similar with higher capacity.
-
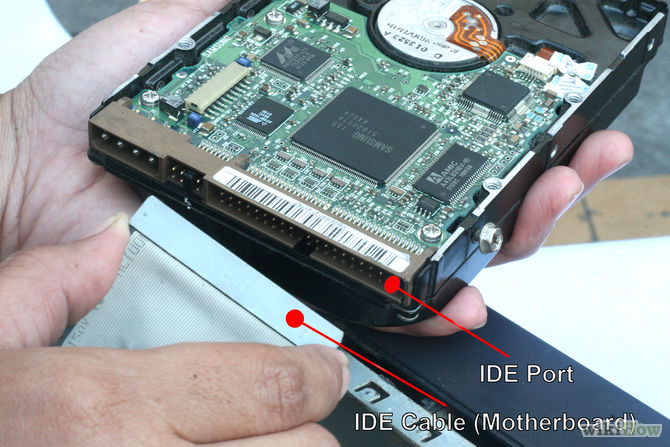
It will be easier to go for the same hard disk data/power connector type i.e. either SATA (Serial ATA) or IDE. Similarly, same physical form factor just like older drive. Check what your motherboard supports to make sure you have the correct replacement drives.

-
Be cautious while the touching electronic components for possible damage to computer parts during handling. You must be grounded while operating within computer. Try wearing anti-static wrist strap for extra precaution or constantly touch the back of the computer case so that metal case may discharge the static electricity.
Now you can replace your hard disk by following these simple steps:
-
Open computer case by removing all screws or de-latching at the back of the tower. Now slide off and the panels.

-
Look up for the existing hard drive. You may find it screwed within a cage inside the computer case.

-
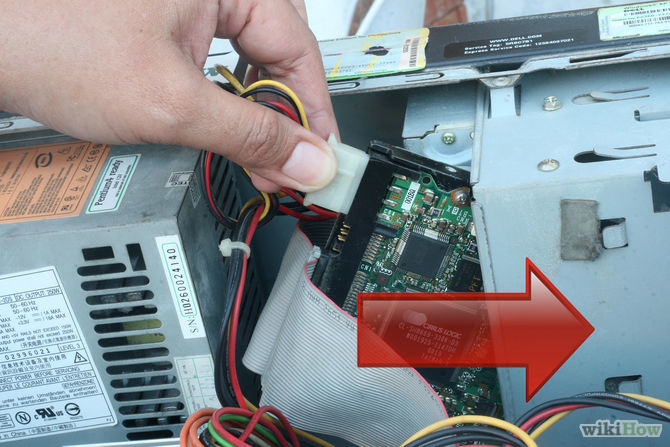
Disconnect the data and the power connectors associated with it.
-
Remove all of the screws if are holding the drive to respective case. Now you can easily slide the hard drive out of the case.

-
If you have a IDE hard drive, move the jumpers on the replacement drive to match the settings of the original. The choices will be Master, Slave or Cable Select. Not required for SATA drives. You can get the reference regarding this step from diagram on the older hard disk's label illustrating the location of the jumpers.
-
Now install the hard drive by sliding the drive back into place of older one.
-
Screw the drive in and reconnect the data and power cables, just like older disk’s setting.
-
Close back your CPU panels.
-
Now here hard ware part is done. Now your new hard disk is ready to use for reinstalling your software or restoring data back by using recovery disks.
Hope this information will help you.
Desktop Computer Hard Disk replacement by Second Cycle student in West Africa
If you are advised to replace the hard drive installed on your computer, check first what type of hard drive your CPU is compatible with. Normally, at present, both IDE and SATA hard drive types are available. Though the SATA type is now widely being used, the IDE type is continuously being used and available in the market.
If your CPU supports both IDE and SATA drives, I would recommend that you use SATA because it offers a much higher RPM or Revolutions Per Minute and available in much higher capacities. If your hard drive has a higher RPM it means you can access data at a much faster speed. And the advantage on using a SATA drive is that it conserves space because it has a much smaller built than with an IDE drive.
For the instructions on how to install it on your CPU, you can refer to the previous post above. When installing a drive, make sure you configure it properly using the jumper. If you will install only one drive, you need to set the jumper setting to primary master or simply master. You can install a maximum of 4 drives including the optical drive or the DVD drive.
If you have four drives, each should be configured as: primary master, primary slave, secondary master, and then secondary slave.


